Creating Interactive Forms with jQuery: A Complete Guide
- Samul Black

- Jul 30, 2025
- 9 min read
Forms play a crucial role in almost every web application. Whether it’s a simple contact page, a sign-up form, or a complex checkout process, forms are how users interact with your site. However, static forms built with plain HTML often feel outdated and unintuitive. That’s where jQuery shines—offering a simple yet powerful way to make your forms smarter, more responsive, and far more user-friendly.
In this blog, we'll explore how to build interactive forms using jQuery from the ground up. You’ll learn how to set up jQuery in your project and begin enhancing form functionality with real-time input validation, conditional field displays, and dynamic feedback that guides users as they type. We'll also cover how to submit form data using AJAX, allowing the form to send information to the server without needing to reload the page. Additionally, we'll show you how to display success or error messages to make the user experience more engaging.
By the end of this guide, you'll be equipped to create polished, interactive forms that elevate the usability of any website—without the need for bulky frameworks or complex JavaScript code.

Why Interactive Forms Matter — And How jQuery Makes Them Better
Forms are one of the most important touchpoints between users and web applications. From newsletter subscriptions and contact pages to registrations and payment checkouts, forms enable users to take action. However, traditional forms can often feel clunky, unresponsive, and prone to errors—especially when users have to wait for full page reloads just to see what they did wrong.
This is where jQuery proves invaluable. With its concise syntax and rich feature set, jQuery allows developers to transform plain HTML forms into highly interactive components. It helps you respond to user input in real time, guide users through the process with instant feedback, and even submit data to the server without reloading the page. By streamlining the experience and reducing friction, jQuery-powered forms not only look more modern—they also perform better, improving both usability and conversion rates.
In the rest of this guide, you’ll learn how to use jQuery to create smarter, more dynamic forms that feel responsive and intuitive from the very first keystroke.
Getting Started: Setting Up jQuery in Your Project
Before you can enhance your forms with jQuery, you need to make sure it's properly included in your project. The easiest way to do this is by linking to the jQuery library using a CDN (Content Delivery Network). This method loads jQuery directly from a fast, globally distributed server—no installation required.
Including jQuery via CDN
To include jQuery in your HTML file, simply add the following <script> tag inside the <head> or just before the closing </body> tag:
<script src="https://code.jquery.com/jquery-3.7.1.min.js"></script>Placing the script before the closing </body> tag ensures the page loads faster, as the HTML content doesn't wait for the script to finish loading. Here’s what a basic HTML template with jQuery included might look like:
<!DOCTYPE html>
<html lang="en">
<head>
  <meta charset="UTF-8">
  <title>jQuery Form Example</title>
  <script src="https://code.jquery.com/jquery-3.7.1.min.js"></script>
</head>
<body>

  <h2>Hello, jQuery!</h2>

</body>
</html>
Verifying jQuery Works with a Simple Example
To make sure jQuery is loaded and working correctly, try running a small script inside a <script> tag after the jQuery link. Here’s a simple test:
<script>
  $(document).ready(function() {
    $("h2").text("jQuery is successfully connected!");
  });
</script>
When you open the page in your browser, you should see the heading text change from "Hello, jQuery!" to "jQuery is successfully connected!" If that happens, you're all set to start building interactive forms.
Enhancing Form Inputs with Real-Time Validation Using jQuery
One of the most effective ways to improve user experience is by validating form inputs in real time—before the user even hits "Submit." Instead of relying solely on server-side validation (which requires the form to be submitted first), jQuery allows you to check form fields as the user types, instantly alerting them to missing or incorrect information.
This not only reduces errors but also builds user confidence, making the form-filling process faster, smoother, and more interactive.
Creating the HTML Form Structure
Let’s start with a basic form that asks for a name, email, and password:
<form id="signup-form">
  <label for="name">Name:</label>
  <input type="text" id="name" name="name">
  <br><br>

  <label for="email">Email:</label>
  <input type="text" id="email" name="email">
  <br><br>

  <label for="password">Password:</label>
  <input type="password" id="password" name="password">
  <br><br>

  <button type="submit">Sign Up</button>
</form>

<div id="form-messages"></div>
Adding jQuery Validation Logic
Next, we’ll use jQuery to validate each field as the user types. We’ll check that:
The name field is not empty
The email field matches a basic email pattern
The password is at least 6 characters long
<script>
  $(document).ready(function() {
    function validateEmail(email) {
      return /^[^\s@]+@[^\s@]+\.[^\s@]+$/.test(email);
    }

    $("#name, #email, #password").on("input", function() {
      let name = $("#name").val().trim();
      let email = $("#email").val().trim();
      let password = $("#password").val().trim();
      let messages = [];

      if (name === "") {
        messages.push("Name is required.");
      }

      if (!validateEmail(email)) {
        messages.push("Enter a valid email address.");
      }

      if (password.length < 6) {
        messages.push("Password must be at least 6 characters long.");
      }

      if (messages.length > 0) {
        $("#form-messages").html("<ul><li>" + messages.join("</li><li>") + "</li></ul>");
        $("#form-messages").css("color", "red");
      } else {
        $("#form-messages").html("All fields look good!").css("color", "green");
      }
    });
  });
</script>
What’s Happening Here?
We're listening for changes on all input fields using .on("input")
As the user types, we check the validity of each field
Feedback is shown instantly in a message box below the form
The feedback dynamically updates as the user corrects mistakes
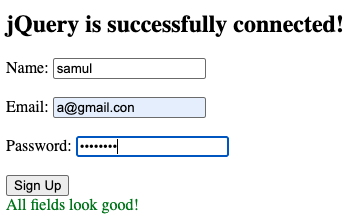
Outputs:
This immediate response system helps prevent user frustration and significantly improves form completion rates. Plus, it keeps your form looking polished and professional with minimal code.
Next, we’ll make your form even smarter by conditionally showing or hiding fields based on user choices.
Conditionally Displaying Form Fields with jQuery
Smart forms adapt to user input. Instead of overwhelming users with too many fields, you can selectively display only the relevant ones. With jQuery, it’s easy to show or hide fields based on user actions—like checking a box or selecting a dropdown option—and make those transitions feel smooth and intuitive using simple animations.
This not only makes your forms cleaner and easier to use, but also keeps users engaged by revealing just what’s necessary, when it’s needed.
Example Scenario: Show an Input When a Checkbox Is Checked
Let’s say you want to display a text field only if the user checks a box indicating they have a referral code.
<form id="referral-form">
  <label>
    <input type="checkbox" id="has-referral"> I have a referral code
  </label>
  <br><br>

  <div id="referral-field" style="display: none;">
    <label for="referral-code">Referral Code:</label>
    <input type="text" id="referral-code" name="referral-code">
  </div>
</form>
<script>
  $(document).ready(function() {
    $("#has-referral").change(function() {
      if ($(this).is(":checked")) {
        $("#referral-field").slideDown();
      } else {
        $("#referral-field").slideUp();
      }
    });
  });
</script>
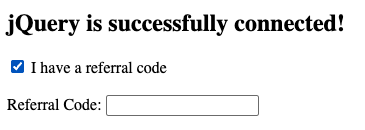
When the checkbox is checked, the referral code field smoothly slides into view. When it’s unchecked, the field disappears just as smoothly.
Example Scenario: Show/Hide Based on Dropdown Selection
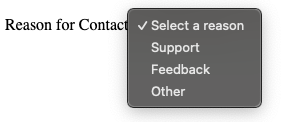
Now let’s say you’re building a contact form where users can choose the reason for reaching out. If they select “Other,” a new text box should appear asking for details.
<form id="contact-form">
  <label for="reason">Reason for Contact:</label>
  <select id="reason">
    <option value="">Select a reason</option>
    <option value="support">Support</option>
    <option value="feedback">Feedback</option>
    <option value="other">Other</option>
  </select>
  <br><br>

  <div id="other-reason" style="display: none;">
    <label for="custom-reason">Please specify:</label>
    <input type="text" id="custom-reason" name="custom-reason">
  </div>
</form>
<script>
  $(document).ready(function() {
    $("#reason").change(function() {
      if ($(this).val() === "other") {
        $("#other-reason").fadeIn();
      } else {
        $("#other-reason").fadeOut();
      }
    });
  });
</script>
These small conditional interactions go a long way. They keep the form clean, reduce cognitive load, and make the user feel in control. Using .slideDown(), .slideUp(), .fadeIn(), and .fadeOut() adds a touch of smoothness that feels polished and intentional.
Submitting Forms with jQuery and AJAX (Without Reloading the Page)
Traditionally, submitting an HTML form would cause the entire page to reload—breaking the flow and often leading to poor user experience. With jQuery and AJAX, you can capture form input, send it to a server asynchronously, and handle the response—all without refreshing the page. This results in a smoother, more modern interaction.
Whether you're saving user data, posting a comment, or handling login credentials, AJAX-powered form submission is a must-have skill for interactive web development.
Capturing Form Data Without Page Reload
Let’s say you have a simple form that collects a user’s name and message. Here's the
<form id="ajax-form">
  <label for="name">Name:</label>
  <input type="text" id="name" name="name"><br><br>

  <label for="message">Message:</label>
  <textarea id="message" name="message"></textarea><br><br>

  <button type="submit">Send</button>
</form>

<div id="form-response"></div>
To prevent the default form submission behavior (which reloads the page), we use jQuery’s submit() event with .preventDefault().
Sending Data to a Server (Mock or Real)
Now let’s add a jQuery script that uses $.ajax() to send the data to a server endpoint:
<script>
  $(document).ready(function() {
    $("#ajax-form").submit(function(e) {
      e.preventDefault(); // Prevent default form submission

      let name = $("#name").val().trim();
      let message = $("#message").val().trim();

      $.ajax({
        url: "https://example.com/submit", // replace with actual endpoint
        type: "POST",
        data: {
          name: name,
          message: message
        },
        success: function(response) {
          $("#form-response").html("✅ Message sent successfully!").css("color", "green");
          $("#ajax-form")[0].reset(); // Clear form fields
        },
        error: function(xhr, status, error) {
          $("#form-response").html("❌ Something went wrong. Please try again.").css("color", "red");
        }
      });
    });
  });
</script>
Handling Success and Error Responses Dynamically
The success: callback runs when the server responds with a status of 200 OK. You can use it to show a message, reset the form, or even redirect the user.
The error: callback handles anything that fails—like a server error or bad request. You can notify the user, log errors, or offer retry options.
During development, if you don’t have a real server endpoint, use a mock API tool like https://webhook.site or https://reqres.in to simulate the backend.
AJAX makes forms feel modern and efficient. The page doesn’t reload, users stay focused, and you have complete control over the UI response. It’s especially powerful when combined with validation and animations for a seamless experience.
Complete Example: A Fully-Interactive Form Built with jQuery
This code snippet showcases a modern, user-friendly web form that leverages jQuery to enhance interactivity, validation, and user experience—all in a single self-contained HTML file. It’s designed to go beyond basic form inputs by dynamically reacting to user behavior, validating data in real-time, and submitting information to a server without reloading the page. Smooth transitions and clear visual feedback make the form both functional and engaging.
Real-time validation for name, email, and password fields
Conditional field display (referral code revealed via checkbox)
Visual feedback with color-coded borders and helpful messages
AJAX-based form submission to a test API endpoint
Animated transitions using .slideDown() and .fadeIn()
Clean, responsive styling with user-focused design
Together, these techniques create a form that doesn’t just collect data—it interacts with the user. Whether you're building a signup form, survey, or onboarding flow, this example offers a foundation you can customize and extend for nearly any use case.
<!DOCTYPE html>
<html lang="en">
<head>
  <meta charset="UTF-8">
  <title>Interactive jQuery Form</title>
  <script src="https://code.jquery.com/jquery-3.7.1.min.js"></script>
  <style>
    body {
      font-family: 'Segoe UI', sans-serif;
      background: #f9f9f9;
      padding: 40px;
    }

    h2 {
      text-align: center;
      margin-bottom: 20px;
    }

    form {
      max-width: 500px;
      margin: auto;
      padding: 25px;
      background: white;
      box-shadow: 0 2px 8px rgba(0,0,0,0.1);
      border-radius: 8px;
    }

    label {
      display: block;
      margin-bottom: 8px;
      font-weight: 600;
    }

    input[type="text"],
    input[type="email"],
    input[type="password"],
    textarea,
    select {
      width: 100%;
      padding: 10px;
      margin-bottom: 15px;
      border: 2px solid #ddd;
      border-radius: 4px;
      transition: border 0.3s;
    }

    .message {
      font-size: 0.9em;
      margin-top: -10px;
      margin-bottom: 10px;
    }

    .message.valid {
      color: green;
    }

    .message.invalid {
      color: red;
    }

    .success {
      background: #e6ffe6;
      color: #006600;
      padding: 10px;
      margin-top: 20px;
      border-radius: 4px;
      display: none;
    }

    .error {
      background: #ffe6e6;
      color: #cc0000;
      padding: 10px;
      margin-top: 20px;
      border-radius: 4px;
      display: none;
    }

    button {
      background: #4CAF50;
      color: white;
      padding: 12px 20px;
      border: none;
      border-radius: 5px;
      cursor: pointer;
      font-size: 16px;
    }

    button:hover {
      background: #45a049;
    }

    #referral-group {
      display: none;
    }

    .icon {
      margin-left: 5px;
    }
  </style>
</head>
<body>

  <h2>Interactive jQuery Form</h2>

  <form id="signup-form">
    <label for="name">Name:</label>
    <input type="text" id="name" name="name">
    <div id="name-msg" class="message"></div>

    <label for="email">Email:</label>
    <input type="text" id="email" name="email">
    <div id="email-msg" class="message"></div>

    <label for="password">Password:</label>
    <input type="password" id="password" name="password">
    <div id="password-msg" class="message"></div>

    <label><input type="checkbox" id="has-referral"> I have a referral code</label>

    <div id="referral-group">
      <label for="referral">Referral Code:</label>
      <input type="text" id="referral" name="referral">
    </div>

    <button type="submit">Register</button>

    <div id="form-success" class="success">✅ Your form was submitted successfully!</div>
    <div id="form-error" class="error">❌ There was an error submitting the form.</div>
  </form>

  <script>
    $(document).ready(function() {
      function validateEmail(email) {
        return /^[^\s@]+@[^\s@]+\.[^\s@]+$/.test(email);
      }

      $("#has-referral").change(function() {
        if ($(this).is(":checked")) {
          $("#referral-group").slideDown();
        } else {
          $("#referral-group").slideUp();
        }
      });

      $("#name").on("input", function() {
        const name = $(this).val().trim();
        if (name.length < 2) {
          $(this).css("border", "2px solid red");
          $("#name-msg").text("Name must be at least 2 characters.")
            .removeClass("valid").addClass("invalid");
        } else {
          $(this).css("border", "2px solid green");
          $("#name-msg").text("Looks good!")
            .removeClass("invalid").addClass("valid");
        }
      });

      $("#email").on("input", function() {
        const email = $(this).val().trim();
        if (!validateEmail(email)) {
          $(this).css("border", "2px solid red");
          $("#email-msg").text("Enter a valid email address.")
            .removeClass("valid").addClass("invalid");
        } else {
          $(this).css("border", "2px solid green");
          $("#email-msg").text("Valid email.")
            .removeClass("invalid").addClass("valid");
        }
      });

      $("#password").on("input", function() {
        const password = $(this).val();
        if (password.length < 6) {
          $(this).css("border", "2px solid red");
          $("#password-msg").text("Password must be at least 6 characters.")
            .removeClass("valid").addClass("invalid");
        } else {
          $(this).css("border", "2px solid green");
          $("#password-msg").text("Strong password.")
            .removeClass("invalid").addClass("valid");
        }
      });

      $("#signup-form").submit(function(e) {
        e.preventDefault();

        const name = $("#name").val().trim();
        const email = $("#email").val().trim();
        const password = $("#password").val().trim();

        if (name.length >= 2 && validateEmail(email) && password.length >= 6) {
          // Mock AJAX
          $.ajax({
            url: "https://jsonplaceholder.typicode.com/posts", // test endpoint
            type: "POST",
            data: {
              name: name,
              email: email,
              password: password
            },
            success: function() {
              $("#form-success").fadeIn().delay(3000).fadeOut();
              $("#form-error").hide();
              $("#signup-form")[0].reset();
              $(".message").text("").removeClass("valid invalid");
              $("input").css("border", "2px solid #ddd");
              $("#referral-group").slideUp();
            },
            error: function() {
              $("#form-error").fadeIn().delay(3000).fadeOut();
              $("#form-success").hide();
            }
          });
        } else {
          $("#form-error").text("❌ Please correct the errors above.").fadeIn().delay(3000).fadeOut();
        }
      });
    });
  </script>

</body>
</html>
Output:
Conclusion: Make Your Forms Speak with jQuery
Interactive forms are no longer a luxury—they’re a user expectation. Throughout this guide, we’ve seen how jQuery can transform plain HTML forms into intelligent, responsive, and user-friendly components. By adding real-time validation, conditional field displays, smooth animations, and AJAX-based submissions, you can significantly enhance both the functionality and feel of your web forms.
These techniques help reduce user errors, provide instant feedback, and create a seamless experience without requiring full-page reloads. More importantly, they show your users that the form is listening and responding to their actions. With just a few lines of jQuery, your forms can become more intuitive and effective.
Now that you’ve seen what’s possible, it’s time to bring that interactivity to your own projects. Whether you're building a signup form, feedback system, or any type of data collection interface, these enhancements can elevate your UI from static to smart. Keep experimenting, keep refining, and let your forms do more than just submit data—make them communicate.


